
Single Sign-On (SSO) Setup
Us2.ai can achieve Single Sign-on (SSO) using SAML/OIDC for cloud, only SAML for onprem.
1.1 Setting up the Identity Provider (IdP)
1.1.1 Cloud (AWS Cognito SAML Setup)
- Provide the following xml file (for our production cognito) to external party to upload and auto populate some information for their SSO application setup or we could provide our cognito information manually
Guideline
SP Initiated SAML
- IdP Entity ID: (Up to the external party)
- SP Entity ID: Us2.ai Cognito SP (Up to the external party)
- ACS URL: https://us2-ai.auth.us-east-1.amazoncognito.com/saml2/idpresponse
- SAMLSubject's NameID: email
- SAMLSubject's NameID Format: urn:oasis:names:tc:SAML:2.0:attrname-format:uri
- Sign assertion: Yes
- Sign authenication request: No
- Login URL: https://us2-ai.auth.us-east-1.amazoncognito.com/oauth2/authorize?response_type=code&client_id=gd0bshntfuoa8c56tkjrjrsb0&redirect_uri=https://app.us2.ai/&identity_provider=<IdP-Entity-ID>
	(<IdP-Entity-ID> in this url is different than the one set by external party, this is the name we set in cognito page, make sure <IdP-Entity-ID> here is set to be the same as their Us2 Subscription name or put this name under their subscription SSO Provider settings)
- Attribute Mapping
  - `email` to `email` (change it based on external party setup)
Note: Setup above is for SAML. Cognito also supports other type of SSO setup such as OIDC if needed.
1.1.2 Cloud (AWS Cognito OIDC Setup)
- External party has to create a OIDC sso application with the following details
- Callback URL/Redirect URL: https://us2-ai.auth.us-east-1.amazoncognito.com/oauth2/idpresponse
- Sign-out URLs (optional)
- Grant Types: Authorization Code
- Client Authentication Type: Client Secret Post
- Login URL: https://us2-ai.auth.us-east-1.amazoncognito.com/oauth2/authorize?response_type=code&client_id=gd0bshntfuoa8c56tkjrjrsb0&redirect_uri=https://app.us2.ai/&identity_provider=<IdP-Entity-ID>
- <IdP-Entity-ID> in this url is different than the one set by external party, make sure <IdP-Entity-ID> here is set to be the same as their Us2 Subscription name
- attribute mapping
- tenant or role (optional)
- or if external party is using AWS Cognito, do the following
- Create a new app client on their cognito with the above callback URL and Sign-out URLs (optional)
1.1.3 On-prem (SAML)
On SAML Idp such as JumpCloud, Azure AD etc, create an SAML application with the following details, example below in JumpCloud
- Upload service provider metadata below to auto populate some of the fields (this xml file assumes the domain is internal-app).
or manually enter the following
- SP Entity ID: https://internal-app.us2.ai/api/users/saml2/metadata/
- ACS URL: https://internal-app.us2.ai/api/users/saml2/acs/
- SAMLSubject NameID: email
- SAMLSubject NameID Format: urn:oasis:names:tc:SAML:2.0:attrname-format:uri
- Signature Algorithm: RSA-SHA256
- Sign Assertion: Yes
- Sign Authentication Request: No
- IdP Entity ID: jumpcloud/Us2.ai/onprem/internal-app
- Login URL: https://internal-app.us2.ai/api/users/saml2/login/?idp=jumpcloud/Us2.ai/onprem/internal-app
- Check "Declare Redirect Endpoint"
- Attribute mapping
- email to email
- Copy the metadata url or export metadata file. (Prefer url option if available as any changes made will be captured dynamically)
Guideline
- IdP Entity ID: <idp-provider> (specified by client, e.g. for azure AD: https://sts.windows.net/97ae560d-1c88-4249-9915-182abdb40198/)
- SP Entity ID: https://<backend-url>/users/saml2/metadata/
- ACS URL: https://<backend-url>/users/saml2/acs/
- SAMLSubject's NameID: email
- SAMLSubject's NameID Format: urn:oasis:names:tc:SAML:2.0:attrname-format:uri
- Signature Algorithm: RSA-SHA256
- Sign assertion: Yes
- Sign authenication request: No
- Default RelayState: keep empty
- Login URL: https://<backend-url>/users/saml2/login/?idp=<IdP-Entity-ID>
- Declare Redirect Endpoint: check the box
- Attribute Mapping
  - `email` to `email` (change it based on external party setup)
	- `username` to `username` (optional, username will be derived from email attribute if not provided)
1.2 Setting up the Service Provider (SP)
1.2.1 On-prem
- Update .env to change authMode to local
US2_AWS_MODE=local - Update user_profile.py with the exported metadata. Please use at least one of the option below, local for downloaded metadata file, remote for the metadata url.
# if not updated in .env US2_AWS_MODE="local" # if custom domain is used # US2_SAML_DOMAIN="some-customer-domain.com" US2_SAML_PROVIDERS = { # Changed to customer name here (will be used to lookup for subscription on version 2.3.0 onwards) 'us2.ai': { # Identity Provider Name (check metadata provided by user and replace it here, used for subscription lookup too if subscription name doesn't match above) # Optional in latest build (automatically populated from metadata) #'entityid': [ # 'jumpcloud/Us2.ai/onprem/localhost', # 'jumpcloud/Us2.ai/onprem/internal-app', #], 'metadata': { 'local': [ # {"url": BASEDIR / 'remote_metadata.xml', 'identifier': 'us2.ai'} ], 'remote': [ # Us2.ai JumpCloud metadata Url for localhost:5000 {"url": "https://sso.jumpcloud.com/saml2/metadata/684a74f561c372c957ebd7c2", "identifier": "us2.ai",}, # Us2.ai JumpCloud metadata Url for internal-app {"url": "https://console.jumpcloud.com/saml2/metadata/63f300e5dcffa17f9f09a93b"}, ], 'mdq': [ # {"url": "https://ds.testunical.it","cert": "certficates/others/ds.testunical.it.cert",}, # noqa ], }, }, } # Optional in latest build (automatically populated from metadata and US2_SAML_PROVIDERS ) # Update IDP_IDENTIFIERS for auto redirection to SSO identity provider based on email domain # <Email domain> to <Identity provider> mapping # US2_SAML_IDP_IDENTIFIERS = { # "us2.ai": "jumpcloud/Us2.ai/onprem/localhost", #} # Override this if want to map other attributes to 'sso_groups' # Default is using Azure AD Groups # EXTRA_ATTRIBUTE_MAPPINGS: dict[str, tuple[str, ...]] = { # 'http://schemas.microsoft.com/ws/2008/06/identity/claims/groups': ('sso_groups',), #} - Subscription lookup.
- On admin page, click on edit subscription, Input the provider name and/or groups (if wanted to match against user.sso_groups)
OR
- Make sure subscription is created before user login from the SSO.
Note: Provider here can be customer_name in the US2_SAML_PROVIDERS (v2.3.0 onwards) or entity_id
# will try to match Subscription name in this order
# provider is the Identity Provider name
# tenant/role could be pass from Attribute Mapping
- <provider>-<tenant>-<role>
- <provider>-<tenant>
- <provider>
- On admin page, click on edit subscription, Input the provider name and/or groups (if wanted to match against user.sso_groups)
- Sample url to access
https://internal-app.us2.ai/api/users/saml2/login/?idp=jumpcloud/Us2.ai/onprem/internal-app
For local testing:
Ensure that xmlsec is available with command xmlsec1 --version.
- For Ubuntu/WSL, `apt-get install xmlsec1 pkg-config libxml2-dev libxmlsec1-dev libxmlsec1-openssl`
- For Mac, `brew install xmlsec1 libxml2 libxmlsec1 pkg-config`
- For Windows, download all the following binaries listed below from [here](https://www.zlatkovic.com/pub/libxml/64bit/).
  - Download 32bit/64bit version as per your machine.
    - xmlsec
    - libxslt
    - libxml2
    - openssl
    - iconv
    - zlib
    - libtool
  - Copy all content of bin folder of each binaries above into a folder (e.g. C:/bin) and add to environment path.
  - Note that, Windows version of pySAML2 (used by djangosaml2) currently not working fine yet (as of 9/2/2023) due to issue mentioned [here](https://github.com/IdentityPython/pysaml2/pull/665).
- For other OS, refer [here](https://pypi.org/project/xmlsec/).
xmlsec should be readily available in most Linux distributions, else install as follows.
1.2.2 Cloud (AWS Cognito for SAML/OIDC)
- Add a new identity provider in
Social and external providers- Choose the SAML option or OIDC
- SAML
- Provider Name: User subscription name
- Identifiers: email domain to check against for this provider
- Required SP-initiated SAML assertions
- Provide metadata document or URL (to be provided by customer)
- map attribute
- email (update this based on customer mapping) to email
- tenant (optional)
- role (optional)
- OIDC
- Provider Name: User subscription name
- Identifiers: email domain to check against for this provider
- Client ID: <Provided by user>
- Client secret: <Provided by user, Optional, can leave it empty>
# if OIDC provider is using cognito, both Client ID and Client secret and be found under app client. Client secret will be optional, depends on if user generates it or not. - Authorized scopes: openid email
- Identifiers: email domain to check against for this provider
- Attribute request method: GET
- Auto fill
- Issuer URL: <Provided by user>
# if the OIDC provider is using cognito, format as follows https://cognito-idp.<region>.amazonaws.com/<user_pool_id> # e.g. https://cognito-idp.ca-central-1.amazonaws.com/ca-central-1_DL4BGdG6i - Map attributes
- email to email
- email_verified to email_verified (optional)
- tenant (optional)
- role (optional)
Note: sub to username will be automatically mapped by cognito. Their username will be <Provider Name>_<sub>. To set a different username, map a field to
preferred_username
- SAML

- Choose the SAML option or OIDC
- In
App clients, add the newly created identity provider to the us2 app client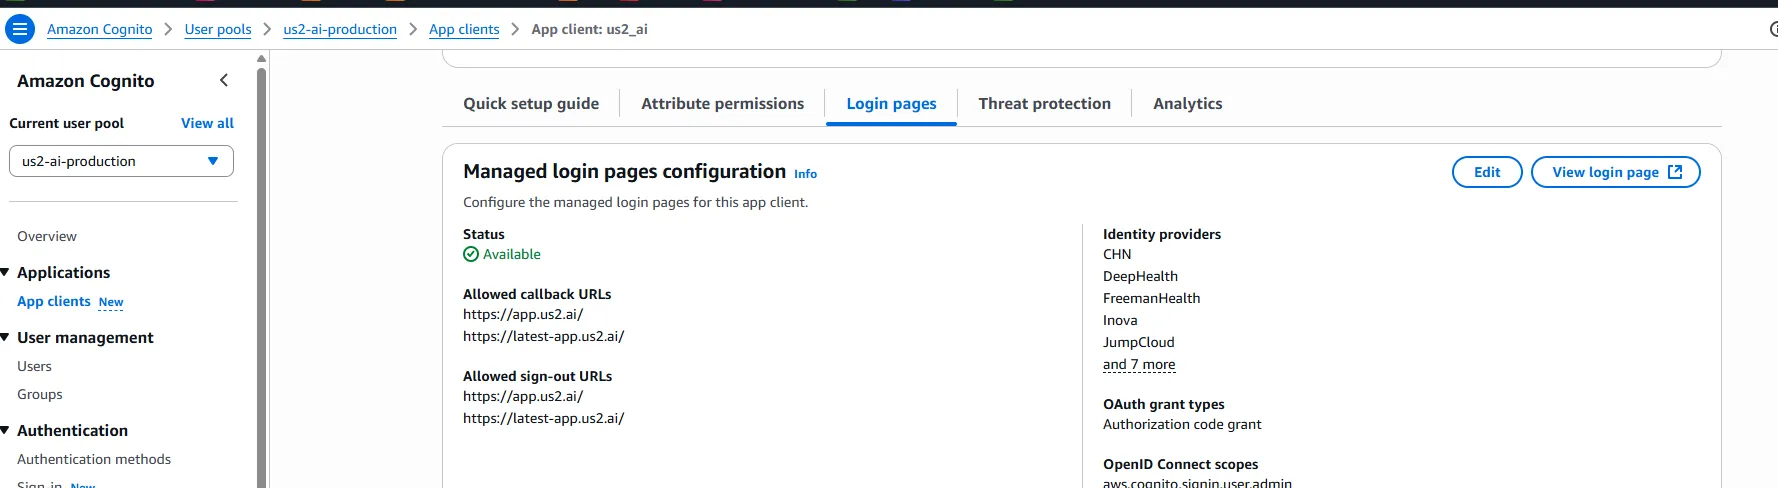
- Subscription lookup.
- On admin page, click on edit subscription, Input the provider name and/or groups (if wanted to match against user.sso_groups)
OR
- Make sure subscription is created before user login from the SSO.
Note: Provider here can be customer_name in the US2_SAML_PROVIDERS (v2.3.0 onwards) or entity_id
# will try to match Subscription name in this order
# provider is the Identity Provider name
# tenant/role could be pass from Attribute Mapping
- <provider>-<tenant>-<role>
- <provider>-<tenant>
- <provider>
- On admin page, click on edit subscription, Input the provider name and/or groups (if wanted to match against user.sso_groups)
- Sample url to access
https://us2-ai.auth.us-east-1.amazoncognito.com/oauth2/authorize?response_type=code&client_id=gd0bshntfuoa8c56tkjrjrsb0&redirect_uri=https://app.us2.ai/&identity_provider=<identity_provider>

# optionally, could append path to state param (which will redirect to that specific path instead)
https://us2-ai.auth.us-east-1.amazoncognito.com/oauth2/authorize?response_type=code&client_id=gd0bshntfuoa8c56tkjrjrsb0&redirect_uri=https://app.us2.ai/&identity_provider=<identity_provider>&state=/us-east-1/search;tags=StudyInstanceUID:1.2.840.113663.1500.1.467288131.1.1.20250123.63612.483//measurement
Revision: A
| Revision | Change Description | Edited by | Release Date | Approval |
|---|---|---|---|---|
| A | Intial Release. Ported from Internal wiki | 2025-11-18 |